It is currently Fri Oct 02, 2026 3:15 pm


All times are UTC - 5 hours [ DST ]


Post new topic Reply to topic  [ 29 posts ]  Go to page 1, 2  Next
Author Message
 Post subject: Re: Color Correction Script (experimentation, very slow)
PostPosted: Tue Jun 10, 2014 12:36 pm  (#11) 
Offline
Script Coder
User avatar

Joined: May 07, 2014
Posts: 4560
Location: Canada
I am not sure what to call the function with, using what percent?
and what to do with the returned value?

_________________
Image
Visualize your and others dreams coming true.


Top
 Post subject: Re: Color Correction Script (experimentation, very slow)
PostPosted: Tue Jun 10, 2014 1:30 pm  (#12) 
Offline
GimpChat Member
User avatar

Joined: Jan 10, 2013
Posts: 863
trandoductin wrote:
Go ->here<- for python version (much faster :roll: )

I used the Python version, but did not notice any change in the image.
Image
Untitled - Nathalie Martin - cc

_________________
bbbbbbbbbbbImage
bbbbbbbbbbb Be patient, English is not my language.


Top
 Post subject: Re: Color Correction Script (experimentation, very slow)
PostPosted: Tue Jun 10, 2014 1:32 pm  (#13) 
Offline
Script Coder
User avatar

Joined: May 07, 2014
Posts: 4560
Location: Canada
okyl168 wrote:
Tried your python script, it doesn't produce the same as Pat's. From the diff, it looks only shifted the red channel and not others.

The script is pure experimentation, but you can try the very bottom version of this post

_________________
Image
Visualize your and others dreams coming true.


Top
 Post subject: Re: Color Correction Script (experimentation, very slow)
PostPosted: Tue Jun 10, 2014 1:38 pm  (#14) 
Offline
Script Coder
User avatar

Joined: May 07, 2014
Posts: 4560
Location: Canada
Akros wrote:
trandoductin wrote:
Go ->here<- for python version (much faster :roll: )

I used the Python version, but did not notice any change in the image.
[ Image ]
Untitled - Nathalie Martin - cc


I tried it too on your image and didn't notice any difference either. I am guessing that your pure white is already pure white and your pure black is pure black and your pure gray is pure gray so the script doesn't do anything.

_________________
Image
Visualize your and others dreams coming true.


Top
 Post subject: Re: Color Correction Script (experimentation, very slow)
PostPosted: Tue Jun 10, 2014 1:43 pm  (#15) 
Offline
GimpChat Member
User avatar

Joined: Jan 20, 2013
Posts: 14835
Location: roma, italy
for me, this is obvious, it is the same that happens when using the auto-correction of Gimp: if there is just 1 pixel pure white, 1 pixel pure black and 1 pixel pure grey, nothing happens!
manually it's different...

_________________
"Where am I ?"


Top
 Post subject: Re: Color Correction Script (experimentation, very slow)
PostPosted: Tue Jun 10, 2014 1:46 pm  (#16) 
Offline
Script Coder
User avatar

Joined: May 07, 2014
Posts: 4560
Location: Canada
but i tried the built-in colors->auto->white balance and it makes a huge difference, looks much better. If you want to do it manually, maybe select a sample average instead of single pixel (as your image looks very noisy) so single pixels of pure white/pure black/pure gray already exists..

_________________
Image
Visualize your and others dreams coming true.


Top
 Post subject: Re: Color Correction Script (experimentation, very slow)
PostPosted: Tue Jun 10, 2014 1:58 pm  (#17) 
Offline
GimpChat Member
User avatar

Joined: Jan 20, 2013
Posts: 14835
Location: roma, italy
I was referring more to Auto Stretching std functions in gimp

(this is what the script performs)

_________________
"Where am I ?"


Last edited by dinasset on Tue Jun 10, 2014 2:01 pm, edited 1 time in total.

Top
 Post subject: Re: Color Correction Script (experimentation, very slow)
PostPosted: Tue Jun 10, 2014 2:00 pm  (#18) 
Offline
Script Coder
User avatar

Joined: May 07, 2014
Posts: 4560
Location: Canada
oh got ya, i was talking to akros hehe

_________________
Image
Visualize your and others dreams coming true.


Top
 Post subject: Re: Color Correction Script (experimentation, very slow)
PostPosted: Tue Jun 10, 2014 2:18 pm  (#19) 
Offline
GimpChat Member
User avatar

Joined: Jan 10, 2013
Posts: 863
The image I chose, has a certain degree of difficulty. Perhaps by having more than one light source. In case the flame in the grill.
Even the technique to detect the lightest and the darkest, points do not work well in this picture.
With visual adjustments, one can obtain best results.

_________________
bbbbbbbbbbbImage
bbbbbbbbbbb Be patient, English is not my language.


Top
 Post subject: Re: Color Correction Script (experimentation, very slow)
PostPosted: Tue Jun 10, 2014 2:35 pm  (#20) 
Offline
Script Coder
User avatar

Joined: May 07, 2014
Posts: 4560
Location: Canada
just for fun i tried on a shark image found here
Attachment:
shark.jpg
shark.jpg [ 329.5 KiB | Viewed 3806 times ]

here's what happens if you run script one more time. it produce a different result (I didn't expect it to). But everytime after that the script no longer changes the image.
Attachment:
sharkmultipleruns.jpg
sharkmultipleruns.jpg [ 322.51 KiB | Viewed 3801 times ]


here's another play with rob ford found here
Attachment:
robford.jpg
robford.jpg [ 663.15 KiB | Viewed 3800 times ]

_________________
Image
Visualize your and others dreams coming true.


Top
 Post subject: Re: Color Correction Script (experimentation, very slow)
PostPosted: Tue Jun 10, 2014 3:06 pm  (#21) 
Offline
Script Coder
User avatar

Joined: Oct 25, 2010
Posts: 4812
trandoductin wrote:
I am not sure what to call the function with, using what percent?
and what to do with the returned value?


1) layer
2) some "percentage" of the pixels with the highest values.

In other words, if you call it with percent=0.05 it will return the "Value" (in the sense of HSV) for which 95% of the pixels are darker and 5% are lighter. Typically you would use it with a smaller percentage (.001). Still avoids to find a white spot at 255 because you have a very small area burned out.

The opposite function to find the dark point, and the one to find the value for which 50% of the pixels are darker and 50% are lighter (what you call the grey point) are left as an exercise for the reader :)

For more info see the description of gimp_histogram in the python procedure browser.

Just for fun, how the algorithm narrows down on the value:

Attachment:
DichotomicSearch.png
DichotomicSearch.png [ 27.16 KiB | Viewed 3268 times ]

_________________
Image


Top
 Post subject: Re: Color Correction Script (experimentation, very slow)
PostPosted: Tue Jun 10, 2014 4:10 pm  (#22) 
Offline
GimpChat Member
User avatar

Joined: Jan 10, 2013
Posts: 863
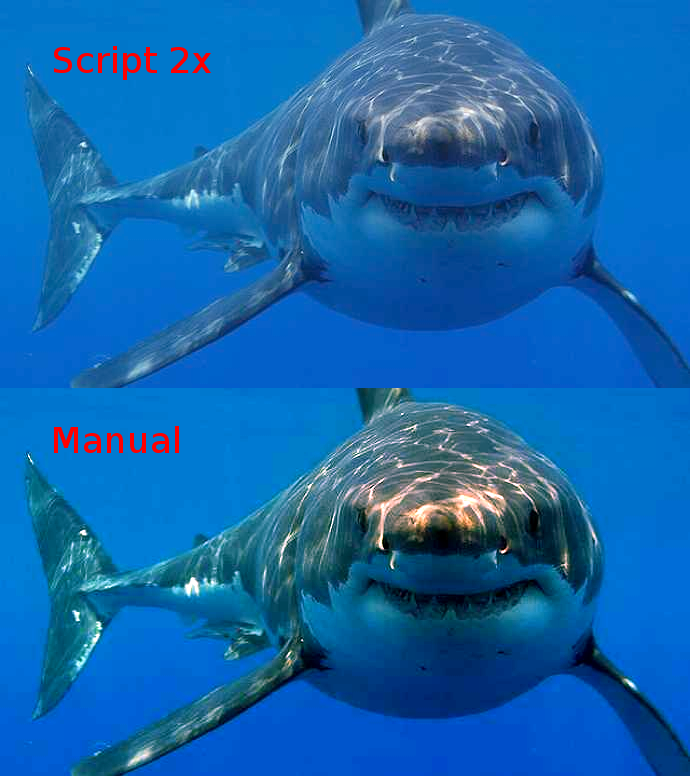
Even running the script twice (2x), the result is quite different from that of the technique shown by PatDavid
Image
The top image using the script, and repeated use again.
The from below, following the tutorial PatDavid

_________________
bbbbbbbbbbbImage
bbbbbbbbbbb Be patient, English is not my language.


Top
 Post subject: Re: Color Correction Script (experimentation, very slow)
PostPosted: Tue Jun 10, 2014 4:23 pm  (#23) 
Offline
Script Coder
User avatar

Joined: May 07, 2014
Posts: 4560
Location: Canada
ofnuts wrote:
trandoductin wrote:
I am not sure what to call the function with, using what percent?
and what to do with the returned value?


1) layer
2) some "percentage" of the pixels with the highest values.

In other words, if you call it with percent=0.05 it will return the "Value" (in the sense of HSV) for which 95% of the pixels are darker and 5% are lighter. Typically you would use it with a smaller percentage (.001). Still avoids to find a white spot at 255 because you have a very small area burned out.

The opposite function to find the dark point, and the one to find the value for which 50% of the pixels are darker and 50% are lighter (what you call the grey point) are left as an exercise for the reader :)

For more info see the description of gimp_histogram in the python procedure browser.

Just for fun, how the algorithm narrows down on the value:

Attachment:
DichotomicSearch.png


I think i am slowly having a clue at the binary search part of it. If i call it with a small percentage, i get a value back that value is like using the threshold and moving it around narrowing it down until white pixels show? correct? but it doesn't tell me what those bright pixels are composed of RGB wise.
If i individual call gimp_histogram on the RGB channels I'll get those values back of where the brightest RED, GREEN, or BLUE are, but the brightest spot might not have all these brightest RGB values for example if there are spots that's pure red (255,0,0)(spot 1)
and a spot that's pure green (0,255,0)(spot 2)
and a spot that's pure blue(0,0,255)(spot 3)
and another spot that's brightest (250,240,230)(spot 4)
calling function with histogram off value will give a value for spot 4 (let's say the value is 240 for example)
calling function with histogram on red channel will give a value me spot 1 (let's say 255)
calling function with histogram on green channel will give a value me spot 2 (let's say 255)
calling function with histogram on blue channel will give me spot 3 (let's say 255)
but from all these I am really interested in spot 4 because it is the brightest, but the value of 240 doesn't give me the RGB components of (250,240,230)

I don't know if i am making any sense or not :oops:

_________________
Image
Visualize your and others dreams coming true.


Top
 Post subject: Re: Color Correction Script (experimentation, very slow)
PostPosted: Tue Jun 10, 2014 4:29 pm  (#24) 
Offline
Script Coder
User avatar

Joined: May 07, 2014
Posts: 4560
Location: Canada
Akros wrote:
Even running the script twice (2x), the result is quite different from that of the technique shown by PatDavid
[ Image ]
The top image using the script, and repeated use again.
The from below, following the tutorial PatDavid

Which script are you using? I have a latest version(very bottom of the python post) that uses luminosity to detect those black/white/gray points.

Manually is a little different too since you do have a choice of sample average which case you're selecting a bunch of pixels and making that white as supposed to the script which only finds 1 pixel that matches.

Plus with manual, if i do it i might choose a different patch of white which might produce different result from yours as well.

Here's a comparison of the latest version of python script that uses luminosity to find those points (very bottom) compared with your version of script run and manual.
Attachment:
scripttwice.jpg
scripttwice.jpg [ 802.38 KiB | Viewed 3251 times ]


What i still don't understand is why running it twice give different result than once. I thought if i ran it once the back pixel is already made black and white already made white and gray already made gray so there should be no change from running it twice but it does on this image and it's tripping me out

_________________
Image
Visualize your and others dreams coming true.


Top
 Post subject: Re: Color Correction Script (experimentation, very slow)
PostPosted: Tue Jun 10, 2014 6:04 pm  (#25) 
Offline
Script Coder
User avatar

Joined: May 07, 2014
Posts: 4560
Location: Canada
Yet, the fact that the script produces different if ran twice bugged me. Maybe because the script is trying set black/white/gray points all at once.

So I changed the script to do it like Pat in his tutorial, first set the white point, then set the black point, then set the gray point last.
So this script is 3 times as slow (because it detects white point first then sets levels to that white point, then detects black point then sets levels to that black point then detects gray point and set levels to that gray point) but it does produce a different result, and running it multiple times does not change your result (so i am happy with that fact because it shouldn't).

Here's the script (yet another version to experiment with)
Attachment:
color-correction-3steps.zip [1.66 KiB]
Downloaded 139 times


here's a sample run on the shark (and running multiple times doesn't change the result)
Attachment:
anotherversion.jpg
anotherversion.jpg [ 126.56 KiB | Viewed 3247 times ]


another full comparison
Attachment:
compare.jpg
compare.jpg [ 284.05 KiB | Viewed 3243 times ]

_________________
Image
Visualize your and others dreams coming true.


Last edited by trandoductin on Tue Jun 10, 2014 8:52 pm, edited 1 time in total.

Top
 Post subject: Re: Color Correction Script (experimentation, very slow)
PostPosted: Tue Jun 10, 2014 7:30 pm  (#26) 
Offline
GimpChat Member
User avatar

Joined: Jan 10, 2013
Posts: 863
trandoductin wrote:
Which script are you using? I have a latest version(very bottom of the python post) that uses luminosity to detect those black/white/gray points.

I am using the first version of python... :roll:
I just somehow not noticing the new updates. :oops:
trandoductin wrote:
So I changed the script to do it like Pat in his tutorial, first set the white point, then set the black point, then set the gray point last.
So this script is 3 times as slow (because it detects white point first then sets levels to that white point, then detects black point then sets levels to that black point then detects gray point and set levels to that gray point) but it does produce a different result, and running it multiple times does not change your result (so i am happy with that fact because it shouldn't).

Manually do in steps 2 or 3, does not change the result.
I generally detect white point and black first. (once)
Then adjust the levels of these points.
After then repeat for the gray.

With the current results, the script is already an aid in the removal of color casts.

_________________
bbbbbbbbbbbImage
bbbbbbbbbbb Be patient, English is not my language.


Top
 Post subject: Re: Color Correction Script (experimentation, very slow)
PostPosted: Tue Jun 10, 2014 7:47 pm  (#27) 
Offline
Script Coder
User avatar

Joined: May 07, 2014
Posts: 4560
Location: Canada
not too sure about this image though
i think it made it a little too blue
Attachment:
oceantooblue.jpg
oceantooblue.jpg [ 1.45 MiB | Viewed 3236 times ]

full original (while the original is not blue enough).
Attachment:
originalocean.jpg
originalocean.jpg [ 1.18 MiB | Viewed 3236 times ]

maybe a 50% opacity of layer that script ran on produces a nicer lighting.
Attachment:
ocean50percent.jpg
ocean50percent.jpg [ 1.39 MiB | Viewed 3236 times ]

_________________
Image
Visualize your and others dreams coming true.


Top
 Post subject: Re: Color Correction Script (experimentation, very slow)
PostPosted: Tue Jun 10, 2014 8:10 pm  (#28) 
Offline
Script Coder
User avatar

Joined: May 07, 2014
Posts: 4560
Location: Canada
And in this photo, the script totally messed up the colors (hence experimental)
Attachment:
flowermessedUp.JPG
flowermessedUp.JPG [ 3.81 MiB | Viewed 3234 times ]

here's the original full
Attachment:
originalflower.JPG
originalflower.JPG [ 3.28 MiB | Viewed 3234 times ]

I am guessing the photo doesn't have a grayish point so when it sets the closest color to gray everything goes out of wack
But if i do it manually(right) the result is subtle but it's there compared the original(left)
Attachment:
manualflower.JPG
manualflower.JPG [ 539.81 KiB | Viewed 3229 times ]

_________________
Image
Visualize your and others dreams coming true.


Top
 Post subject: Re: Color Correction Script (experimentation, very slow)
PostPosted: Wed Jun 11, 2014 2:22 am  (#29) 
Offline
Script Coder
User avatar

Joined: Oct 25, 2010
Posts: 4812
trandoductin wrote:
ofnuts wrote:
trandoductin wrote:
I am not sure what to call the function with, using what percent?
and what to do with the returned value?


1) layer
2) some "percentage" of the pixels with the highest values.

In other words, if you call it with percent=0.05 it will return the "Value" (in the sense of HSV) for which 95% of the pixels are darker and 5% are lighter. Typically you would use it with a smaller percentage (.001). Still avoids to find a white spot at 255 because you have a very small area burned out.

The opposite function to find the dark point, and the one to find the value for which 50% of the pixels are darker and 50% are lighter (what you call the grey point) are left as an exercise for the reader :)

For more info see the description of gimp_histogram in the python procedure browser.

Just for fun, how the algorithm narrows down on the value:

Attachment:
DichotomicSearch.png


I think i am slowly having a clue at the binary search part of it. If i call it with a small percentage, i get a value back that value is like using the threshold and moving it around narrowing it down until white pixels show? correct? but it doesn't tell me what those bright pixels are composed of RGB wise.
If i individual call gimp_histogram on the RGB channels I'll get those values back of where the brightest RED, GREEN, or BLUE are, but the brightest spot might not have all these brightest RGB values for example if there are spots that's pure red (255,0,0)(spot 1)
and a spot that's pure green (0,255,0)(spot 2)
and a spot that's pure blue(0,0,255)(spot 3)
and another spot that's brightest (250,240,230)(spot 4)
calling function with histogram off value will give a value for spot 4 (let's say the value is 240 for example)
calling function with histogram on red channel will give a value me spot 1 (let's say 255)
calling function with histogram on green channel will give a value me spot 2 (let's say 255)
calling function with histogram on blue channel will give me spot 3 (let's say 255)
but from all these I am really interested in spot 4 because it is the brightest, but the value of 240 doesn't give me the RGB components of (250,240,230)

I don't know if i am making any sense or not :oops:


If you need the points that are about white, then first use gimp_by_color_select_full to select pixels wil little color (selet on color white, and use SELECT_CRITERION_S with a low threshold (so you are selecting only pixels with a very low saturation value). Then gimp_histogram will only apply to selected pixels and whatever comes out is the value of the brightest gray pixel so its color is (value,value,value).

_________________
Image


Top
Post new topic Reply to topic  [ 29 posts ]  Go to page 1, 2  Next

All times are UTC - 5 hours [ DST ]


* Login  


Powered by phpBB3 © phpBB Group