What to do with the filter code: (first make sure you have the correct version of G'MIC to support it. If you don't know, ask the author.)
This video is for 1st time G'MIC users (best viewed with full screen):
Let's take PhotoComix's Graphic Novel FX filter (this same code can be found here
viewtopic.php?f=11&t=972#p10512 under the first post).
Step 1: Highlight and copy the code below to the clipboard (CTRL + C)
##############GRAPHIC#NOVEL#Fx##########################
#@gimp Graphic Novel FX : gimp_photocomix_booost2, gimp_photocomix_booost2(0)
#@gimp : sep = separator ()
#@gimp : note = note("Apply Local Normalization")
#@gimp : SKIP this step = bool(false)
#@gimp : note = note ("Check the box will disable the 4 sliders below")
#@gimp : sep = separator ()
#@gimp : note = note(" Local Normalization Controls")
#@gimp : LN Amplititude = float(2,0,60)
#@gimp : LN Size = float(6,0,64)
#@gimp : LN Neightborhood-Smoothness = float(5,0,40)
#@gimp : LN Average-Smoothness = float(20,0,40)
#@gimp : sep = separator ()
#@gimp : sep = separator ()
#@gimp : note = note(" Pencil Options")
#@gimp : Pencil Size = float(0.12,0,4)
#@gimp : Pencil Amplitude = float(14,0,200)
#@gimp : sep = separator ()
#@gimp : note = note(" Do you wish to smooth the pencil effect ?")
#@gimp : Activate "Pencil Smoother" = bool(false)
#@gimp : note = note(" If unchecked the 3 sliders below are disabled ")
#@gimp : sep = separator ()
#@gimp : Pencil Smoother Sharpness = float(0.5,0,2)
#@gimp : Pencil Smoother Edge Protection = float(0.54,0,1)
#@gimp : Pencil Smoother Smoothness = float(1.12,0,10)
#@gimp : sep = separator ()
#@gimp : note = note ("Boost Merging Options")
#@gimp : BOOST Merging Option = choice (Overlay , Multiply, Soft light,Color Burn,Color Burn swap,Darken,Stamp,Hard Light,Value ,Value-swap, Freeze)
#@gimp : Opacity = float(1,0,1)
#@gimp : sep = separator ()
#@gimp : Add Painter's Touch = bool()
#@gimp : note = note(" If unchecked the 3 sliders below are disabled ")
#@gimp : sep = separator ()
#@gimp : Painter's Touch Sharpness = float(0.5,0,2)
#@gimp : Painter's Edge Protection Flow = float(0.54,0,1)
#@gimp : Painter's Smoothness =float(0.78,0,10)
#@gimp : sep = separator(), note = note("<small>Author : <i>PhotoComiX</i>. Last update : <i>2011/1/6</i>.</small>")
#@gimp : note = link("Filter explained here","http://www.gimpchat.com/viewtopic.php?f=9&t=775")
gimp_photocomix_booost2 :
-repeat @# -l[$>] -split_opacity -l[0]
-if {$1==0} -gimp_normalize_local $2,$3,$4,$5,1,3,0 -elif {$1==1} -gimp_do_nothing -endif
--gimp_pencilbw $6,$7,0,0,0
-if {$8==0} -gimp_do_nothing[1] -elif {$8==1} -gimp_anisotropic_smoothing[-1] 60,$9,$10,$11,1.1,0.8,30,2,0,1,1,0,1,0 -endif
-if {$12==0} -gimp_compose_overlay[1,0] $13
-elif {$12==1} -gimp_compose_multiply[1,0] $13
-elif {$12==2} -gimp_compose_softlight[1,0] $13
-elif {$12==3} -gimp_compose_colorburn[1,0] $13
-elif {$12==4} -reverse[1,0] -gimp_compose_colorburn[1,0] $13
-elif {$12==5} -gimp_compose_darken[1,0] $13
-elif {$12==6} -reverse[1,0] -gimp_compose_stamp[1,0] $13
-elif {$12==7} -reverse[1,0] -gimp_compose_overlay[1,0] $13
-elif {$12==8} -reverse[1,0] -gimp_compose_value[1,0] $13
-elif {$12==9} -gimp_compose_value[1,0] $13
-elif {$12==10} -reverse[1,0] -gimp_compose_freeze[1,0] $13 -endif
-if {$14==0} -gimp_do_nothing -elif {$14==1} -gimp_anisotropic_smoothing 60,$15,$16,$17,1.1,0.8,30,2,0,1,1,0,1,0 -endif
-endl -a c -endl -done
##########################################################################
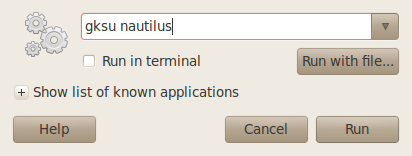
(New users of G'MIC will have to create their own .gmic file - skip to step 3)Step 2: You'll need to open the .gmic file. In Ubuntu, this file can be found in /home/username/, which in my case would be /home/mahvin/ but I will need administrative rights to open .gmic, so I press alt + F2 and type "gksu nautilus"
You'll be prompted for your password.
Step 3: Browse to /home/username/ and press CTRL + H to display hidden files (the period in front of .gmic indicates it's a hidden file), scroll down to find .gmic
(NOTE: New users will not see these files, since you have not used G'MIC yet) ***New Users: Open Gedit, paste the code into the file and then save the file as .gmic, making sure to save it in your /home/username/ folder. (This tutorial is assuming you're doing these steps for the first time). If I am not mistaken, you'll still need administrative rights to save the .gmic file. Someone correct me if I am wrong.***
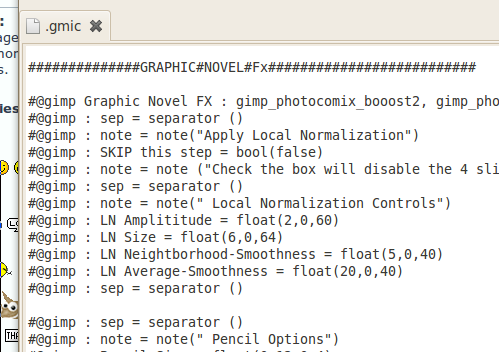 Step 4:
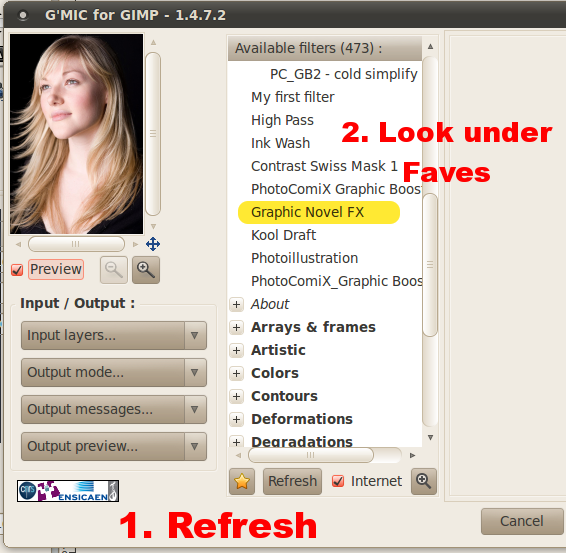
 Open GIMP, then open an existing image for testing. And call up G'MIC (Filters - G'MIC).
Refresh G'MIC and look under Faves for the new filter. You're done.
 ####################################################ADDING PRESETS FOR GRAPHIC NOVEL FX
Remember seeing those other .gmic files above? In this case, we'll need the .gmic_faves file to add presets.
New users will have to create their own .gmic_faves file , just like in step 3 above for .gmic, simply because you have not used G'MIC yet. I wrote this tutorial for current G'MIC users, not thinking about new users.At the bottom of post #3 found here
viewtopic.php?f=11&t=972#p10517 you'll see this code:
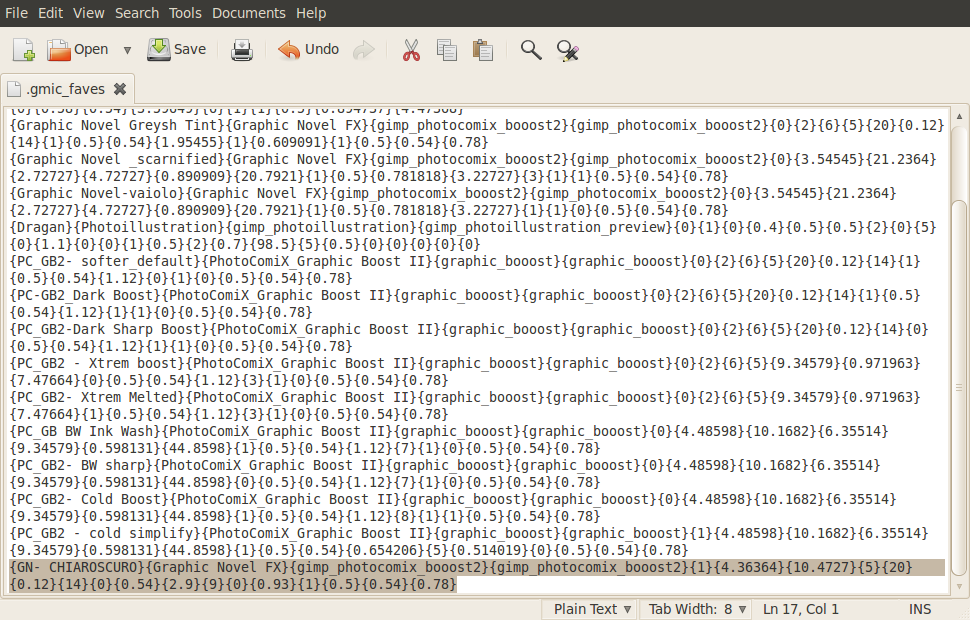
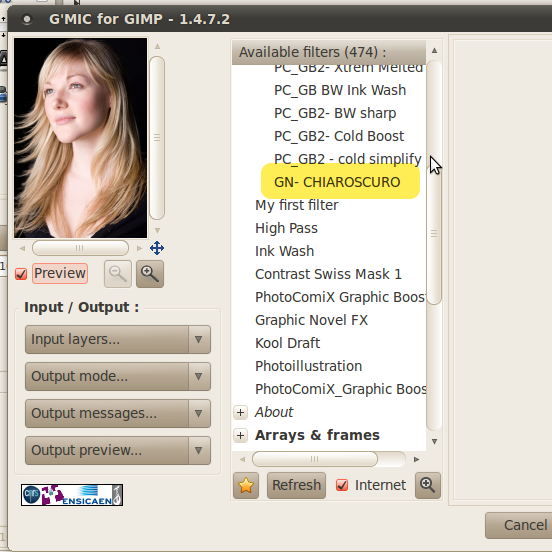
{GN- CHIAROSCURO}{Graphic Novel FX}{gimp_photocomix_booost2}{gimp_photocomix_booost2}{1}{4.36364}{10.4727}{5}{20}{0.12}{14}{0}{0.54}{2.9}{9}{0}{0.93}{1}{0.5}{0.54}{0.78}PhotoComix shows examples of what this preset does in one of the images shown above the code on post #3. To use it, you'll need to add it to the .gmic_faves file found in /home/username/
I highlighted the code in the image below so you could see how the preset was listed in the file along with many others.
Your file will be blank, so copy and then paste the above preset into the .gmic_faves file and save it.
(New users, open Gedit, paste the preset code in and save it as .gmic_faves in your /home/username/ folder.)IMPORTANT: (If you decide to add new presets, you cannot have ANY blank lines in the .gmic_faves file. You can start a new preset on the next line, but no lines between or at the end. Failing to acknowledge this will result in your preset not showing up in Faves.)
Successful implementation will result in your preset showing indented at the top of the Faves list (see the G'MIC UI image below).
Have fun and good luck!


 Video from :


 and now that I think of it, .gmic_faves gets created automatically when you save a filter in G'MIC, so any new users wouldn't see these files (double