I was recently complemented on one of my sigs and asked if I would do a tutorial on how to make the metal frame, mesh and finish. I decided to go ahead and do a six part series of tutorials that will cover several methods for creating different types of metal textures and finishes, plus how to create and assemble pieces and parts to create plates, frames, interfaces, or anything else you want to make with metal.
Since this series of tutorials on metal textures would not be complete without some basic brushed metal, we’ll start by reviewing this simple procedure.
You can easily find many tutorials on how to make a simple brushed metal texture using one of two basic ways. Most will show using HSV Noise, or like I have done below using RGB Noise. The problem is they usually only show you how to make one kind of brushed metal. I will show you how to make four kinds of brushed metal, and how to add highlights, dirt smudges, corrosion or rust.
I have also included a gradient and a script that you will need to complete some of the steps in this tutorial. Download the attachments and place them in your “user” gradients and scripts folders. Don’t forget to refresh your scripts/gradients or restart Gimp.
OK. Let’s get started.
Step 1.
Open a new image (any size will do – I’m using 1000 x 1000 at 300 dpi). The image should be the default white when you open it. If you set your BG color to the gray color in step 2 before opening your image, your image will already be gray when you open it
Step 2.
If your image is still white, then go ahead and change your Foreground color to a medium gray like 808080 and drag it over to your image, or you can use the Bucket Fill tool, to fill the layer with gray.
Step 3.
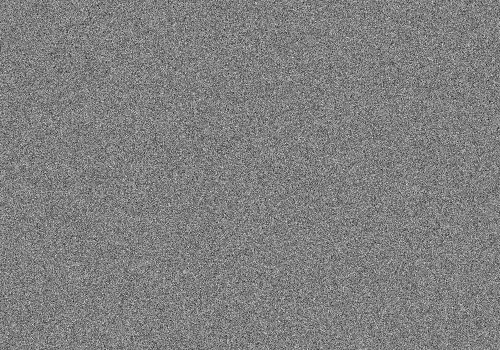
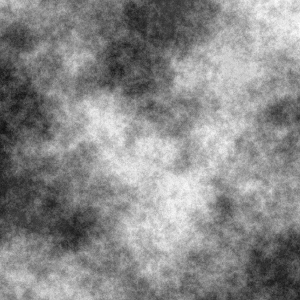
Go to Filters>Noise>RGB Noise and use the default .20 for all three settings, Check the box labeled Correlated Noise and make sure to uncheck the Independent RGB box, then click OK. This will give us a grayscale noise layer instead of a bunch of multi-colored dots.
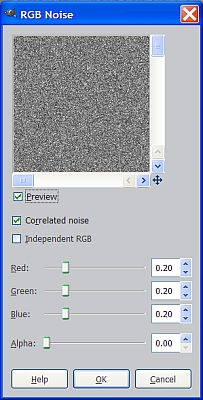
Your noise layer will basically look like a lot of dots.
Step 4.
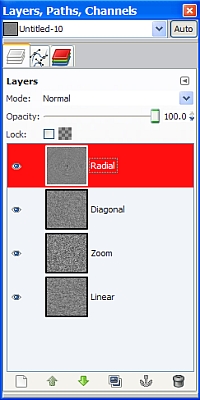
Duplicate the noise layer 3 times and name the duplicates Radial, Diagonal and Zoom in that order, from top to bottom in the layers dialog. Rename your background layer to Linear.
Your layers should now look like this with the Radial layer on top.
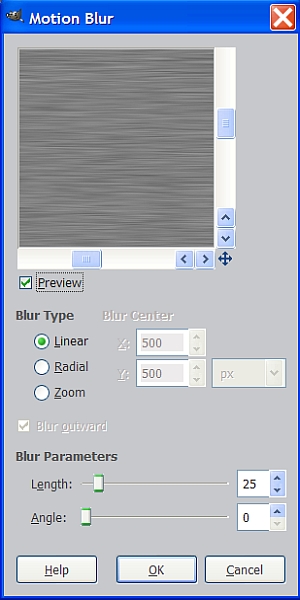
Step 5.
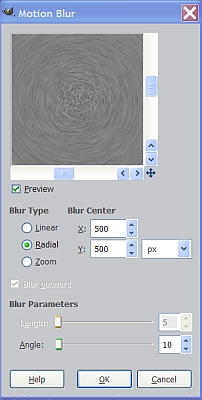
Select the Radial layer and Go to Filters>Blur>Motion Blur and select Radial. Set the angle to 10. Motion Blur always takes a few minutes to complete, so now is a good time to grab that cup of coffee.
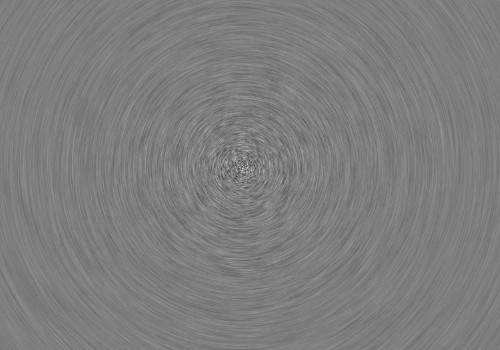
The result will be something similar to this.
Step 6.
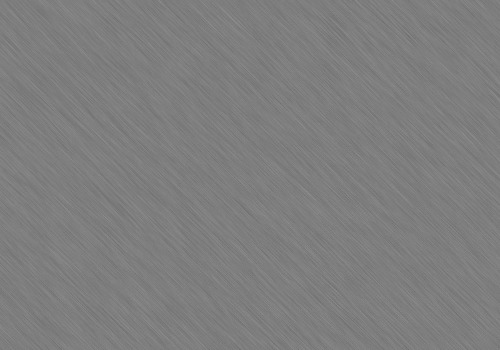
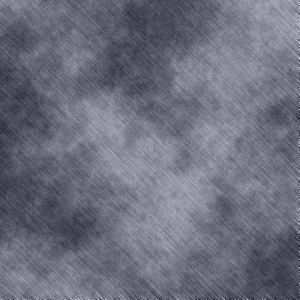
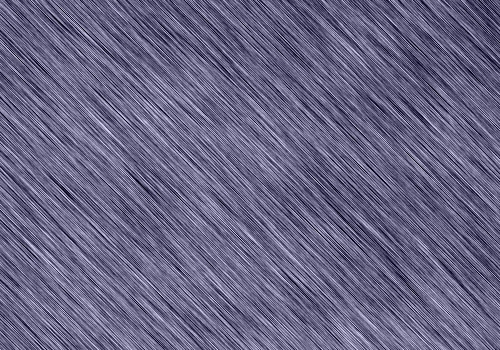
At this point, the appearance is subjective and you might want to try adjusting the contrast a bit to bring out the texture a little more, but for our purposes we will skip that step. Tick the eye in front of the Radial layer to turn off the visibility and you should now be looking at the Diagonal layer in your image window. Click on the Diagonal layer in the layers dialog to make it the active layer, and go to Filters>Blur>Motion Blur again, but this time set the Blur Type to Linear, Length to 25 and the Angle to 45.
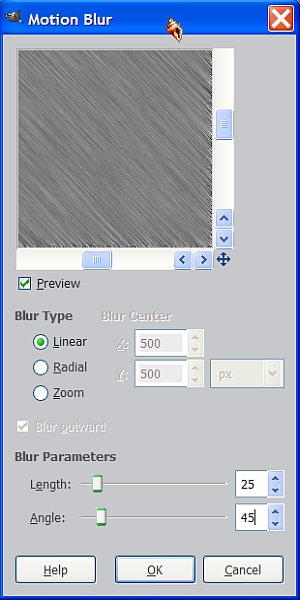
You image should be similar to this.
Step 7.
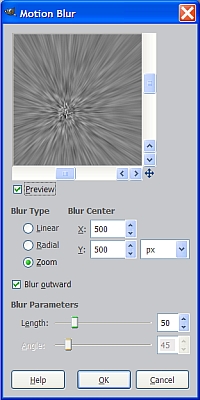
Turn off the visibility on the Diagonal layer and select the Zoom layer to activate it.
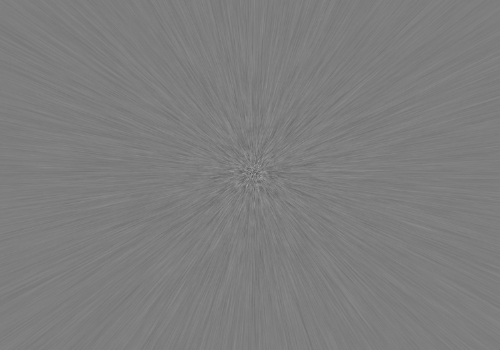
Repeat Step 6 except in the Motion Blur dialog set the Blur Type to Zoom, and the length to 50.
Now we have a pattern that looks like this.
Step 8.
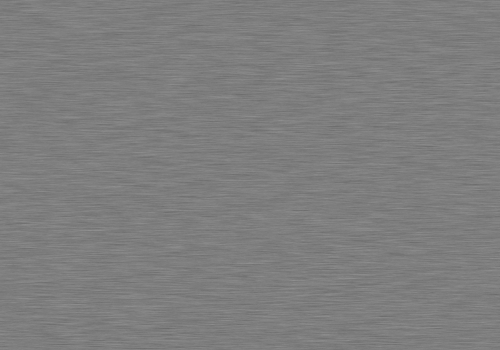
Now for the final step. Turn off the visibility of the Zoom layer and select the Linear layer. Go to Filters>Blur>Motion Blur and use the same settings as in Step 6 except set the Angle to 0.
We now have a Linear pattern and a total of four different ways to make brushed metal.
You can also use Filters>Distorts>Wind to get s similar effect to using the Motion Blur Filter, but only for the Linear type. You can always rotate your layer afterwards to get the Diagonal.
From here you can add color by creating a transparent layer above your image, fill it with your color, then set the layer mode to Overlay, Grain Merge, or whatever you think looks best. Another way is to go to Colors>Colorize and experiment with the Hue, Lightness and Saturation settings.
Step 9.
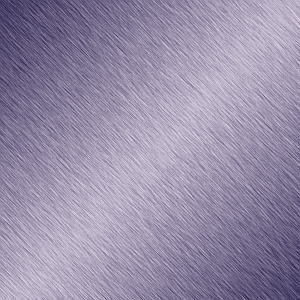
For the image above I used a simple FG/BG gradient, on a transparent layer above the Diagonal layer. I used the default black & white colors, and set the gradient Shape to Bi-Linear. I then made a diagonal stroke from the center of the image to the corner and then set the layer mode to Overlay, and set the Opacity to about 70%. I then created a blue layer above these two layers with the layer mode set to Overlay to add some color.
To give your image another kind of highlight, create a new transparent layer above your brushed metal layer (pick one) and reverse your FG/BG colors so the Foreground color is White (FFFFFF) and the background is Black (000000). Select the Gradient tool again but this time set the Shape to Radial. Now, drag from the center of your image to one of the corners to make your gradient. Set the layer Mode to Grain Merge and the Opacity to 70%. You can experiment with different gradients to make whatever highlights you desire, and adjust the Opacity as needed.
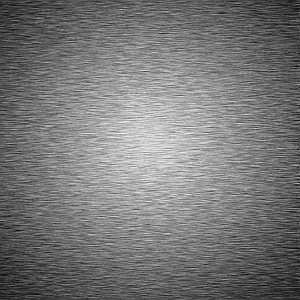
Here’s what it looks like with a radial gradient and without the color overlay.
Step 10.
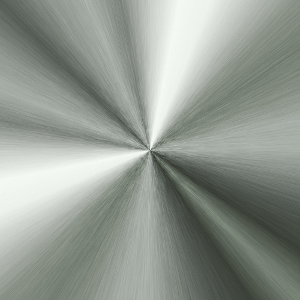
If you want a really shiny metallic effect, there are a couple of ways to do it depending on the type metal you are using. For the Radial or Zoom layers you can use this method. Turn off the visibility on all layers except the Zoom layer (or you can use the Radial layer). Create a new transparent layer above it and select the Gradient tool. Choose Rod’s Steel_Pencil_RD gradient provided with this tutorial, and set the Shape to Conical.
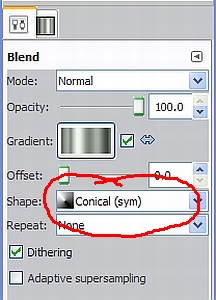
Drag from the center of your image to any corner to create the gradient. Set the layer mode to Hard Light and lower the Opacity to about 70%.
Step 11.
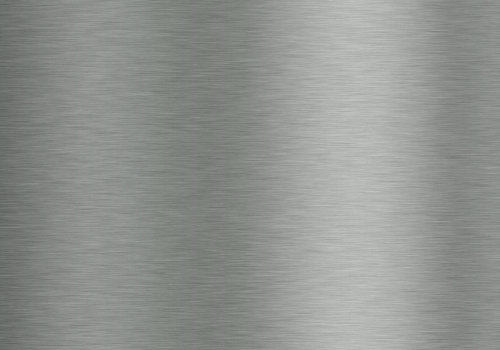
For the Linear layer we do this a little differently. Turn off the visibility on all the other layers except the Linear layer. Create a transparent layer above it and use the same gradient we just used for the Zoom layer except this time we need to set the shape back to Linear. Click on the left side of the image and with your other hand hold down the control key (this gives you a straight horizontal line) and drag across to the other side of your image to create the gradient. Now go to Filters>Blur>Gaussian Blur and set both values to 100 and click ok. Set the Opacity to 50% and the layer mode to Grain Merge.
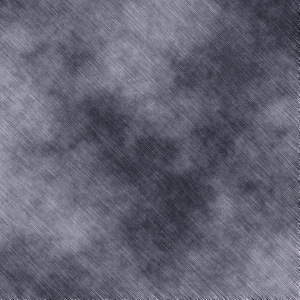
You should get a nice subtle highlight finish to your brushed metal texture like this.
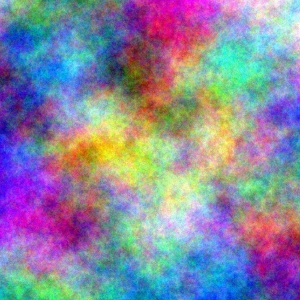
Let’s look at some ways to give your metal a little more character. We’re going to use the diagonal layer for this exercise (without the shiny metallic gradient layer) so turn on the visibility for the Diagonal layer and turn off all the other layers. Create a new transparent layer above the Diagonal layer and name the new layer “color”. Fill it with a nice blue-gray (I used 565472) and set the layer mode to Overlay. Now create another transparent layer between these two layers and call it “plasma”. Go to Filters>Render>Clouds>Plasma and set the turbulence to about 2.4. Click on the box that says New Seed a few times to get a fairly uniform mix of colors with not too much red or blue. When you have selected the seed you want to use, click OK.
You will get something like this.
Step 12.
We don’t want our Plasma layer to interfere with our Color layer, so to fix this, go to Colors>Desaturate and select Lightness. This gives us a grayscale (no colors) plasma layer to work with like this.
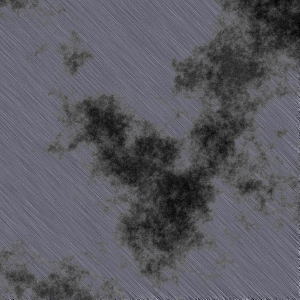
Set the Plasma layer mode to Overlay and you will not only see your texture, but the color, and the “smudged dirt” we just made as well. To make your Diagonal layer more prominent, duplicate the Diagonal layer and move it just above the plasma layer, set the duplicated Diagonal layer mode to Grain Merge. You can also apply a slight Gaussian blur to the plasma layer to smooth it out a little. (If you decide to use the blur step, you will need to “undo” the blurring for the next few steps.) Here’s what you should have without the blurring.
Step 13.
Let’s take this to the next level. By using different layer modes and a few other simple tweaks, we can make our metal have all kinds of effects. Let’s do a really simple one by using Colors>Invert to reverse the black and white grain of our image like so. You don’t have to do this, but there are times when it does come in handy. I used Invert here because wanted the dark parts to be more in the middle and it also shows you another way you can adjust the look of your metal.
Now experiment with your layer modes. Here’s where the Seed on your Plasma filter comes into play. With more or less blue and red colors you get more or less dark areas.
Set the Plasma layer mode to Darken only and we get this.
You can use several different plasma layers and get some other super effects., but rather than reinvent the wheel, go take a look at some of the tutorials at the link below for Rust, the Scott Effect, and to get an idea of some of the other things you can do with your metal textures.
http://gug.criticalhit.dk/?page=tutorialsIf you don’t already have it, the Scott Effect is actually available as a script now, and I have included it for you just in case. It shows up under Filters>Render>Corrosion. If we use the image above without the plasma layer and apply this filter using the default settings, we get a really cool looking corroded effect like this.
Step 14.
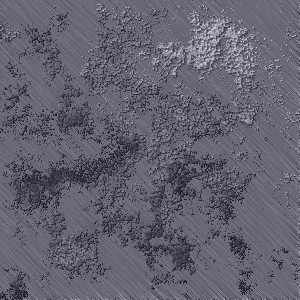
The way I make a rusty or corroded look is to cheat a bit. Well, it’s not really cheating, just a different way. Still using the Diagonal layer, turn off visibility on the plasma layer. Go to File>Open as Layers and go find your favorite rusty metal image, something with a little character to it. Place your rust image layer above the Diagonal layer and make sure any other color layers or plasma layers are turned off. Right click on your rust image layer in the layers dialog and select Add Alpha Channel.
If your rust image is too small you may want to resize it by using the Scale tool, or if it is too large, just right click on it in the layers dialog and select Layer to Image Size.
Set the layer Mode to Overlay. The rust layer tends to obscure our brushed metal pattern a bit so to correct this, duplicate your Brushed Metal layer and move the duplicated layer above the rust layer and set the layer mode to Grain Merge just like we did in Step 12. You can stop there or you can really add some depth to your image by using the Bump Map filter.
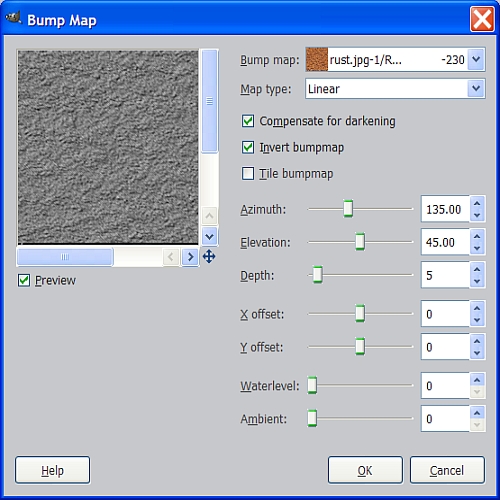
Step 15.
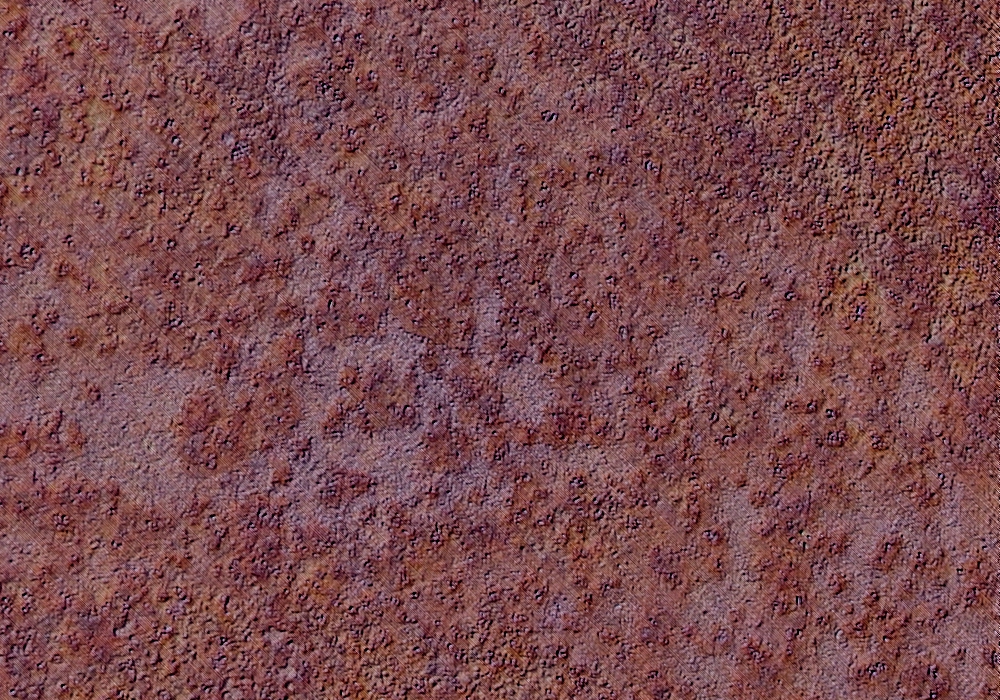
Click on the brushed metal layer under the rust layer, and go to Filters>Map>Bump Map. In the box at the top of the Bump Map dialog, make sure you select your rust image layer as the one you want to use for mapping, then set the depth at about 5 or so, and leave everything else at the default settings, except check the box for Invert bump map.
Here is an example of what your image might look like, depending on what kind of rust layer you use and how you do your bump mapping.
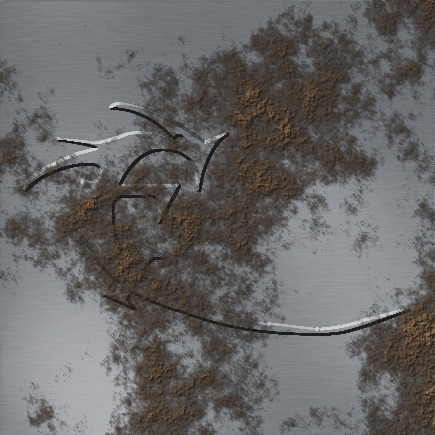
Experiment and learn I always say! This is another rust texture using Colors>Desaturate, with a slight Gaussian Blur applied, and with a blue-gray color layer above, and layer mode set to Grain Merge. This shows another way to get that smudged dirt look.
I hope you enjoyed this tutorial.
Metal Wurx is a six part series dealing with different aspects of making metal. I would also like to encourage you to check out the other tutorials in this series as they become available.
Part II will deal with using different shapes to make perforated metal.
Part III will deal with how to make different kinds of treadplates.
Part IV will show you how to make metal mesh & expanded metal.
Part V will show you how to apply Gold, Chrome, Copper and other shiny metallic finishes.
Part VI will deal with making shapes like frames, plates and interfaces as well as how to apply shadows, highlights, and other lighting effects.